Cancel Flow Run in Power Automate

There are several use cases in which it's required to cancel flow runs that are in progress.
Cancel the Flow Run action is part of Power Automate Management.
"If  a flow created to send an email to users based on the status and if due to any discrepancies or glitch the data get entered incorrectly and due to this users will get multiple emails and their inbox will be flooded. In such cases cancellation of the running instance of flow is needed"
This blog includes steps by which one can cancel the running instance of Power Automate Flow.

How to cancel the running instance of the Power Automate Flow:

To Cancel flow using the the Power Automate Management Connector, we need to follow the steps mentioned below:
  • To stop the Power Automate flow, we will need the run ID of the flow. To get the run ID of the running instance, go to run history and click on the flow link. 
    PowerAutomate

    From the URL section of the browser go to the and and copy the ID entered after the runs. Keep this flow run ID for the next steps.
    Flow Run ID


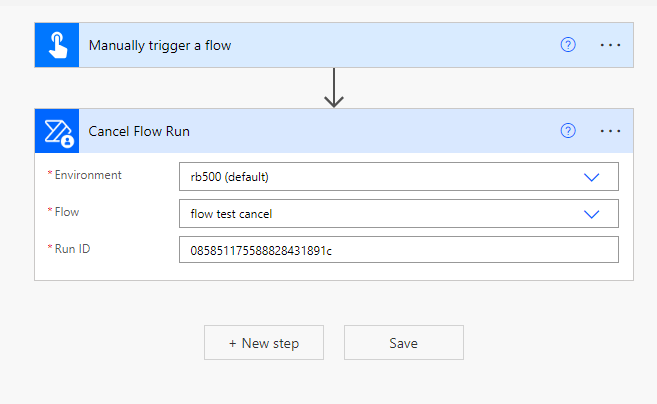
  • Create One manually triggered flow and click on the "add an action" and add a "Power Automate Management Connector" in the flow. 
    Power Automate Mangement

    Now you will have the option to cancel the flow run instance. Select the flow and paste the run id of the flow that we copied in the above steps.

  • Now run the flow, we have created and the flow get cancel.
Conclusion:
In several scenarios it is required to cancel the flow instances, Power Automate management connector provide us option to cancel the flow using the run Id. In this blog we discussed about the cancellation of the flow using the Power Automate Manager.
#PowerAutomateManager #PowerAutomate

Comments

Popular posts from this blog

SPFx Interview Questions With Answers

In this article, we are going to discuss interview questions related to the SPFx (SharePoint Framework Development ). It will help you to prepare for the interview and in getting clarity on the core concepts of SPFx development. What is SPFx? SPFx, short for SharePoint Framework,  SPFx  allows us for client-side SharePoint development, we can easily connect with SharePoint data and it also supports for open source tools. What is the major difference between SPFx web part and the SharePoint app? Both the development model supports client-side development but the major difference between these two is that the SharePoint app(add-in) runs on the iframe. What you can build with SPFx? Using SPFx framework we can customize the SharePoint pages. We can build things mentioned below using the SharePoint Framework(SPFx). Web parts, Extensions, Adaptive Card, Library Component How many types of extensions we can create using SPFx? SPFx has three extension types: Application Customizers: Using the

How to register an app in SharePoint

In this article, we are going to learn how to register an app/add-in in SharePoint online. If you have created a Sharepoint provider-hosted add-in or other SharePoint solution and to access the SharePoint site or list using the app/add-in you need to register the add-in on SharePoint and to grant permission. Register app in SharePoint 1. Login into SharePoint and Navigate to register an app page. Use the URL mentioned below:          [Sitecollection URL]/_layouts/15/appregnew.aspx 2.  Once you navigate to the Register app page, a form will open. You need to fill all the fields on the form. Client Id and Client Secret  generated when we click on the generate button available next to the fields.  Title : Name of the add-in which you want to give. App Domain : Where your domain is hosted, for the local environment you can place             "www.localhost.com". Do not include HTTP or HTTPS in App Domain. Redirect URL :  Insert the redirect URL, for t

Permission XML for SharePoint Add-in

In this article, we will be discussing the permission XMLs, which are used to provide permission to SharePoint add-in. Permission XML for the SharePoint app. You can set the App only permission, by setting "true" or "false" in  AllowAppOnlyPolicy=“true” in these permission XMLs.   If add-in granted permission to tenant scope, It includes all children in scope. Before granting access to the app, need to register an app. Follow this link for step by step guide to  How to register an app/add-in in SharePoint   Providing access to add-in at tenant level: To provide access at tenant level user must have the tenant admin level permission. To grant this permission tenant admin can use this URL   https://tenantName-admin.sharepoint.com/_layouts/appinv.aspx Search the App Id (Client ID) and it will fetch all the information which you provide at time of registration of app.   Assign full control at tenant level : <AppPermissionRequests AllowAppOnlyPolicy="true&quo