"You can't add this app here" error in SharePoint

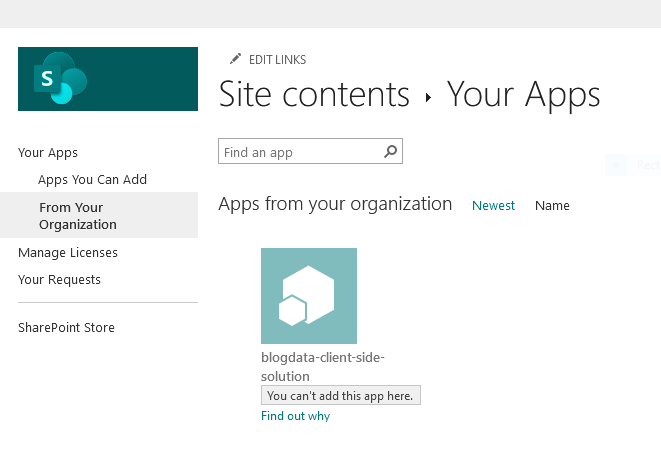
Once you add your app to app catalog and then you go to the site collection and you select the add an app option, and you search the app and you see the error message “You can't add this app here”. 

You can't add this app here is the common issue users get while installing the SharePoint apps or SPFx packages.

add an app sharepoint

 
This is a generalize message shown in various situations. You can check the reason on clicking "Find out why".

Some of the causes and there solutions are listed below: 

Cause 1 : Good news - you already have this on your site.
 
First Scenario :
Meaning of this message is that app is already added on the site, go to the Site content and check that app is already exist or not, If exist and still you want to add it, uninstall the app and also remove it from the recycle bin and then you will be able to add this app.

Second Scenario : 
If you checked the site content and app is not installed, go to the recycle bin (also to admin recycle bin) and if app is there remove it from both the place and then you will be able to add this app.
 
SharePoint app


Cause 2 : Sorry, you don't have permissions to add apps here.
 
Reason behind this message is the user who is adding this add-in do not have appropriate permission.
Check the permission of the user and minimum permission requirement to add an app on site is 
"Full Control permission (or membership in the Site Owners group) is the minimum requirement".
It may change in some special cases. 


Thanks!!!!
 
 If you have any query on this, please mention in comment.
 

Comments

  1. I am getting below error message after approving the permission.
    Sorry, this app is not supported on your server.

    How can I resolve this issue?

    ReplyDelete
    Replies
    1. You are getting this error on sharepoint online or on on-premise???

      Delete

Post a Comment

Popular posts from this blog

Permission XML for SharePoint Add-in

In this article, we will be discussing the permission XMLs, which are used to provide permission to SharePoint add-in. You can set the App only permission, by setting "true" or "false" in  AllowAppOnlyPolicy=“true” in these permission XMLs.   If add-in granted permission to tenant scope, It includes all children in scope. Before granting access to the app, need to register an app. Follow this link for step by step guide to  How to register an app/add-in in SharePoint   Providing access to add-in at tenant level: To provide access at tenant level user must have the tenant admin level permission. To grant this permission tenant admin can use this URL   https://tenantName-admin.sharepoint.com/_layouts/appinv.aspx Search the App Id (Client ID) and it will fetch all the information which you provide at time of registration of app.   Assign full control at tenant level : <AppPermissionRequests AllowAppOnlyPolicy="true">   <AppPermissionRequest  Scop

How to register an app in SharePoint

In this article, we are going to learn how to register an app/add-in in SharePoint online. If you have created a Sharepoint provider-hosted add-in or other SharePoint solution and to access the SharePoint site or list using the app/add-in you need to register the add-in on SharePoint and to grant permission. Register app in SharePoint 1. Login into SharePoint and Navigate to register an app page. Use the URL mentioned below:          [Sitecollection URL]/_layouts/15/appregnew.aspx 2.  Once you navigate to the Register app page, a form will open. You need to fill all the fields on the form. Client Id and Client Secret  generated when we click on the generate button available next to the fields.  Title : Name of the add-in which you want to give. App Domain : Where your domain is hosted, for the local environment you can place             "www.localhost.com". Do not include HTTP or HTTPS in App Domain. Redirect URL :  Insert the redirect URL, for t

How to create list from template in sharepoint

In this article, we are going to learn how to create a list from list template or using(.stp) file or we can say create list from existing list. Once you save the list as a template, It appears into List template option under the web designer gallery on site setting page. Steps to create list from list template: 1 Move to the site setting section where you have saved the list template. 2. When you click on the List templates, you will redirect to the List template gallery and from the list template gallery. 3. Now click on the File in ribbon and click on the upload document. 4. Browse the location where your list template is downloaded. I am uploading the template of an address list. 5.  After browsing the template, now you can give the name what you want to give to the list template and click on save. 6. Now the list template file appears into the list template gallery. Now click on the gear  icon and click on the Add an app. 7. On clicking add an app,